Sunday, March 24, 2013

Art Work (Painted by my daughter Shan)

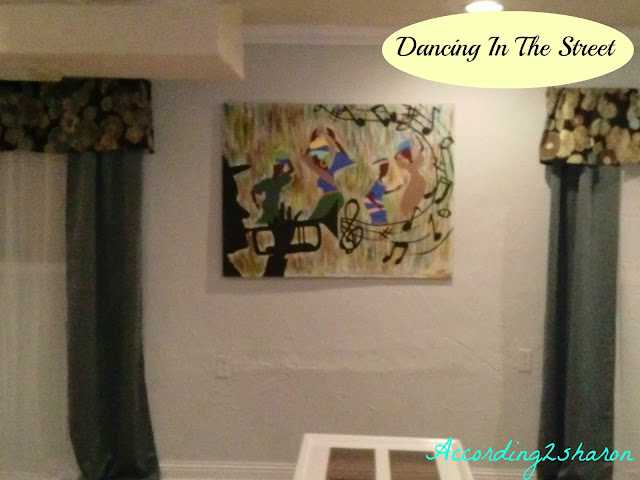
This is a must share moment! I am so proud and excited to share with you a painting my daughter painted for me two days ago. She has been drawing every since she could hold a crayon, and now at almost 21 years old she has blossomed into a very very good artist and truly has a passion for art.

She is so busy with her new baby," my sweet grandson" I couldn't believe she could even find the time to work on it. So with out further ado let me just show you.


She calls it dancing in the streets!


Of course this painting has found a home in the basement which happens to be the area I'm making over at the moment, so it was perfect for this wall. And I was so pleased. 
(side note: Those curtains have been removed and put up stairs in the kitchen)
 They just didn't work for me in this space


On one of my many trips to the Acmoore Craft store that's going out of business not to far from where I live I came across this canvas on sale for $22.00.


And for this size I couldn't pass it up 


Pretty large huh?

she has painted two others for me that I have in my bedroom , they were also featured in several contest here in town where she won 1st and 2nd place.

Let me show you ( Bonus Pictures) I'm just a proud Mama right now. (You moms understand!!!)


 How she managed to find the time between washing baby bottles, Feeding baby, and all her other motherly duties I will never know...... But I sure am proud of the woman she has become

Meet The little guy that has completely stole my heart away.


Thanks for joining me in my proud mama moment!

Have a great rest of the weekend and please come back soon now.....


Yours Truly, 
Sharon

Saturday, March 23, 2013

DIY Sun Burst (Using Shims)

Its called project over load or is it Saturday boredom? Whatever it may be I have been up in here busy being as crafty as I know how to be today(shopping in my own home). Decorating is so much fun (wouldn't you agree?) and when you can create projects for little or no money that makes it even more fun. Right? Since I'm on this serious mission decorating my basement I am always, I repeat always searching for neat Ideas to make my own, In my last post I made a sun burst out of poster board, And I liked it so much I decided I would create another one. Except this time I used wood shims and a little something special, that's near and dear to my heart (jewelry).

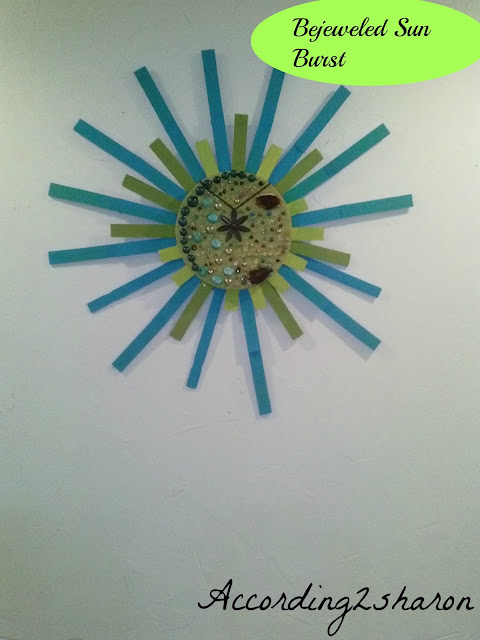
Lets take a look at how this one turned out:


I used some old jewelry that I wasn't going to wear anymore, But didn't want to part with just yet.
(I just love my jewelry even if I'm not wearing it) alone with some random beads I had from my jewelry making.

What I like most about the sun burst in general is how much space it takes up,(you can make it as large or as small and you choose) I like it BIG! It also comes in handy when you have a fairly large wall you want to cover.


I really like the jewelry part and since I already made one with a mirror I thought this would be a neat idea, plus I hadn't seen one quite like this one yet, And I love it.


Here's how I made this bedazzled beauty!

SUPER EASY INSTRUCTIONS:

1. I Gathered all the things I thought I would need. Of course along the way I changed some things out. (You know how projects sometimes take a turn!!!!!)


2. I then cut out a circle  in  the cardboard to use as the back of my sun burst and the part I would attach the shims too to create the sun burst.  I then gathered my shims into piles according to length.


3. (side note) I attached two shims together to get longer lengths (used a glue gun of course)
Now its time to paint my shims.


4. Then I began attaching the shims to the cardboard: I filled in the spaces until I had a complete circle with my desired lengths using the longest first then the next length then I attached the shortest last.


5. I used  a lid from one of those plain boxes that I purchased from ACmoore
(like the ones I decorated for storage in my craft room) I have so many it crazy!  I just used one and covered it with fabric first. Then I began embellishing it with Jewels.

Once I had it like I wanted, I then hot glued the whole thing right on top of the shims let dry and placed on the wall in my up and coming dining room. (stay tuned for that also)

It was simple, easy, and free because I had everything already! (Now I cant beat that with a stick)


Thanks for stopping by as always, Feel free to look around the blog at older post if you haven't already and please come again soon.


Yours Truly, 
Sharon
I'm linking up at:
http://www.savvysouthernstyle.net/

DIY Sun Burst (Poster Board)

I have FINALLY started working on the basement, Its a work in progress for sure. My hubby jump on board with the decorating one room at a time idea once I completed our daughters Princess Room. As part of the plan I promised him that I would thrift 85% of the design to save money and still allow us to be able to enjoy a beautiful space Once and for all.( He Agreed)

With that being said I had been looking online for ideas I could do or recreate  to begin decorating the walls. One thing that had always caught my eye here on the Internet and in the Blog World  was the "sunburst" there are tons of ways to make them and things to use to make them, I was sold. They take up a nice amount of space which is what I wanted and they can be very cheap to make. So with that being said I began making one for myself and adding of course my own flare. The whole process took just under an hour.

Lets get started shall we?  This is how it turned out


This was so fun, And super easy to make and it only cost me roughly $1.32  total.


I added a little something extra! (because I'm a little extra)


Now lets talk about just how easy this was to make, and what all I used.

I purchased 5 poster boards from ACmoore which cost me $.57 for all 5 poster 
(That going out of business sale is right on point)
One poster board  made 6 strips I used 2 1/2 poster boards for the whole project.

I already had my round mirror from a metal sunburst I had, That I was about to trash, So i just removed the mirror and tossed the rest.

I purchased the wooden circle from  Acmoore as well for only .75 that brings us to a total of  $ 1.32
I already had the paint, the glue gun and the Time.

Here's the easy process of putting it together.


Next you will need to decide how wide you want your strips (that's up to you)
I didn't measure anything I just folded the board into strips that looked to be the same size. You can measure yours out if you like for a more perfect precise look.


I used my craft scissors to cut the edges. I then painted my wooden circle blue(left over paint) and let dry.

Once all the strips were cut and my painted circle was dry I began to hot glue down the strips, making sure I glued using the North, South, East and West method. And gluing down my shorter pieces first and filling in in between with the larger pieces. Until I reached my desired fullness and that's it!!!! Simple Right?


 And I ended up with this


It added just what I needed to the basement, And didn't even cost as much as a cup of coffee
 (hubby was happy about that). Stay tuned for updates on the basement as they come available and have a happy weekend.

Yours Truly,
Sharon

Friday, March 22, 2013

Chair Makeover

I almost forgot about showing you the finished look of the chair I reupholstered and put in my daughters room during  her princess room makeover, Over a month ago (shame on me)

Remember this is a chair that was in my free stuff from Craigslist.

Here's how it turned out:


While it was fun making this chair over it did prove to be a bit of a challenge


I just love all the details, and I am so head over hills for lace trim (love it)


Its also a comfy rocker by the way, and my daughter loves sitting and reading her favorite book, or tweeting, or browsing the web while kicking back in her cutie pie chair.


This is what this old Gal use to look like:


So whenever your in the area stop on by Minks palace she just might let you rock for awhile in her Fabulous chair.


Thanks for stopping by, Have a great weekend!!!!


Yours Truly, 
Sharon


Wednesday, March 20, 2013

DIY Easy Spring Wreath

Hellooooo...... Finally spring has finally sprung. Its about time right? Now all I need for it to do is actually feel like spring, nice and warm. I decided today to STOP all projects that are currently in progress and sit down and make my spring wreath.

I picked up a wreath from a thrift store the other day Just for the twig part. I threw away the horrible ensemble that was on it and added my own special touch. And I only paid $1.00 for it.


I added a ribbon to complete the look and  tadaaaaa!!!!!! A wreath was formed I played around with the placement of flowers until I got it just how I wanted it.

I already I had the flowers in my stash from other projects. So I would say my Spring Wreath cost me a total of 3.00 The little blue birdie was 2.oo at Acmoore (going out of business sale).

Happy Spring Everyone.......Now I'm ready for Summer. What about you?

Please stay tuned for all the exciting projects that I am working on. Come back and visit soon.

Yours Truly, 
Sharon 

I'm Linking up at:
http://www.savvysouthernstyle.net/ 

Saturday, March 16, 2013

DIY Box Decorating

I was out and about the other day Just browsing and always in search of a deal that might happen to fall into my lap of course, when all of a sudden  I ran up on this. And let me tell you I almost ran my car up on the curb trying to read it and make sure my eyes wasn't playing a dirty trick on me.


WHATTTT!!!!!  Honey! I threw my car into park and ran walked into the store fast as I could. 
this is a crafters second heaven. I expected it to be somewhat chaotic but it wasn't that bad. I mean If you don't count the half empty shelves, or the stuff all over the floor, or the two ladies arguing at the register about a price. I mean It was to be expected.Right? Some craft doers take crafting to a whole new  level especially when a sale is involved and its ONLY ONE OF SOMETHING LEFT. (I'm just saying)
Anyhoo! I did pretty good! what do you think?

My bill was $105.12 which was very well spent considering how much stuff I had, and of course I was eager to get the heck back home to stock my craft room, and take inventory just in case I needed to go back. Mind you it was about a 35 min drive to the next city. So today Saturday I plan on going back just to see what all they have left if anything,And seeing a 75% off sign would be an even nicer treat to see when i get there. ( hehehehe)
OK OK  I will settle for a 50% off sign.( But really I WANT the 75% off sign) :)

There was one thing out of all my finds that I really wanted to show you and it was these here


These ranged in prices from 1.oo to 1.71 I think the large round one was 2.00. When I saw these I thought of the endless I mean endless possibilities I could do with them. Right? You are probably sitting there right now thinking too, of all YOU can do with em' and I know you came up with more then three things you can use these boxes for.  Here's what I did with mine:


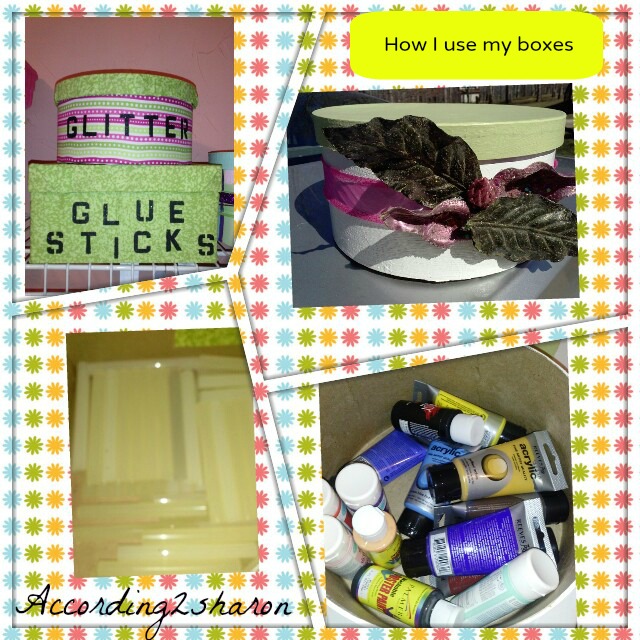
I had some old flowers here at home and decided to use them along with some ribbon, I hand painted this box with regular wall paint I had left over. This box holds my paints!


This wine box would make a Great Gift to someone or use it as nice pretty box to hold new paint brushes that haven't been used yet.


Another Hand painted box with ribbon detail. You can go as Crazy as you want or as Simple as you want.


I covered these with fabric squares that I also picked up from there for 1.oo, I just wrapped them like presents and use my glue gun to secure the fabric....I then stenciled my label on the front and WHALLAAAA!!!!! Storage boxes that are easy on the eyes, functional and so crafty.


These are all being used in my fabulous Craft Room/ Mom Retreat. I just wanted to share that with you. I hope you have a great weekend and Make sure you come back soon ok??????


Yours Truly, 
Sharon

Wednesday, March 13, 2013

Chair Redo (Sisters) Reunited

When I start a project I go in on it hard, Once I start I have to complete it or at least get all the major stuff done and out the way. (or I will not be able to sleep) And what I do when working on a major project like a room redo I always sit down and figure out what major components have to be in the space. Then I head out and thrift them. (YUP THAT'S RIGHT)

So when I began working on my Craft room I knew I wanted two chairs. I knew in my mind what they needed to look like and feel like. Then I remembered how much I really liked the chair I redone in my guest bedroom. And how it would function just perfect in my space, because It rolled. Yes It has wheels! lol I might just  need to roll from one area to the next while working on projects or something! (ha ha)

I figured why not go back to the place I found that chair right? ( I am such a genius) that's a start. And so I did. And just like her (the original chair) sat her sisters almost in the same spot I found her. It was three of them but I only needed two. I felt bad having to leave one behind. But I had no choice.

I rushed them home to reunite them with their other sibling and to show them how pretty they were going to look once I was done making them over. I will show you a picture of the chair in her before stage. I didn't take pictures of the two new ones Before Picture because its I identical to this one


I really love the style of these chairs, I'm guess someone probably used them as dining room chairs at one point in their lives. Here is the link to the story of this particular chair just in case you missed it :)

I would like to introduce to you my new chairs that are now being used in my craft room


I didn't want them to be exactly the same so I switched some things up on them as you can see. They are sisters not twins (ha ha) And since they are in my craft room I wanted to make them a little fun and playful.


They are really showing off their new clothes honey. (WORK IT YALL)


I figured since you will see the backs of them first when walking into the room that should be the part that has the most "va va voom"


And that's the story of the three sister chairs reunited folks. 

 I couldn't leave her out she was the first you know?


Thanks for stopping by.....Come back soon and see whats poping!

Yours Truly,
Sharon